A Star Battle Guide
During the COVID-19 pandemic, I randomly decided that I wanted to get good at solving Sudoku puzzles. I learned advanced techniques, delved into the world of Sudoku variants, and had a lot of fun along the way! However, I found one aspect extremely tedious: counting from one to nine repeatedly for each row, column, and shape to see what was left. By chance, I came across Star Battle—a binary determination puzzle which can be well-described as binary Sudoku. Needless to say, I got obsessed. With far fewer resources available for Star Battle than for Sudoku, I enjoyed developing my own techniques for tackling (and speed-solving) difficult Star Battle puzzles. This page is the long-overdue culmination of this journey!
If you have questions about any part of the guide, please reach out and I'll try my best to clarify things!
Acknowledgements
Thanks to Quietus for proofreading this page and to Teal for an initial attempt at documenting some of these techniques.
Star Battle rules
Each puzzle consists of a sub-divided grid and specifies a number of stars (e.g., 2★). The objective is to place stars in each row, column, and shape such that:
- The number of stars in each row, column, and shape equals the specified number of stars.
- No two stars are adjacent horizontally, vertically, or diagonally.
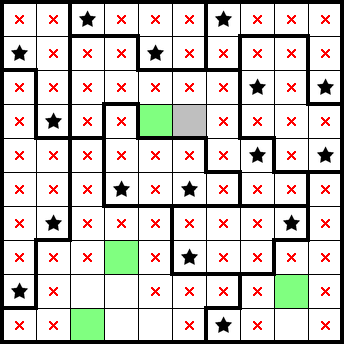
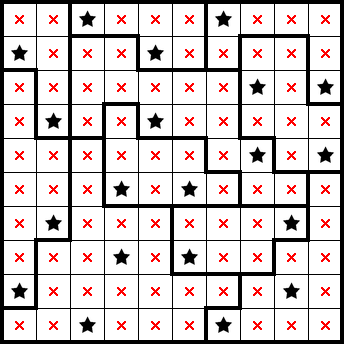
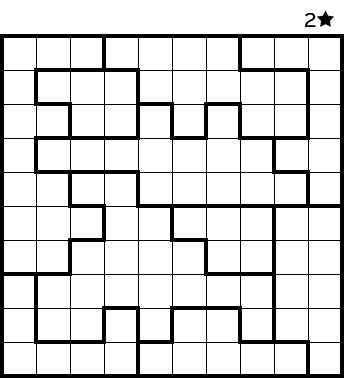
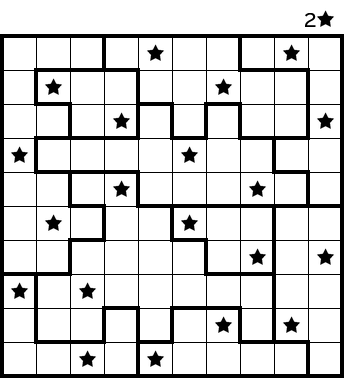
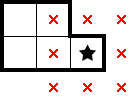
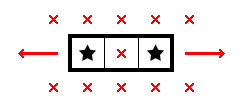
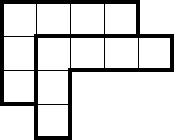
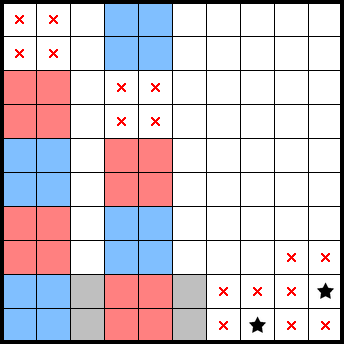
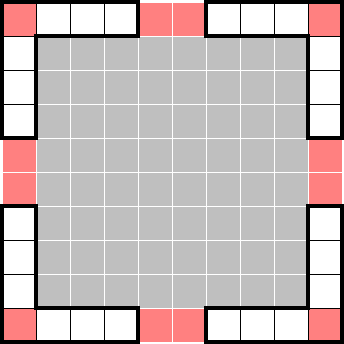
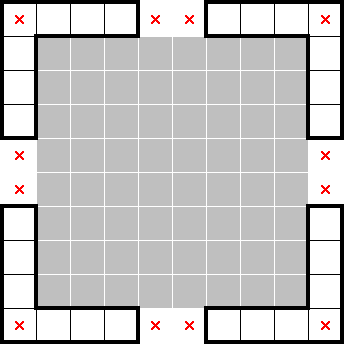
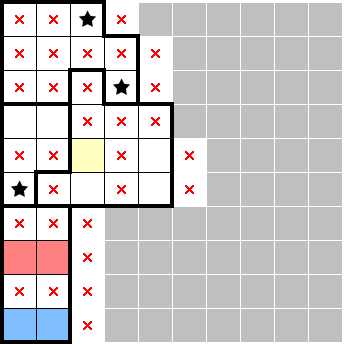
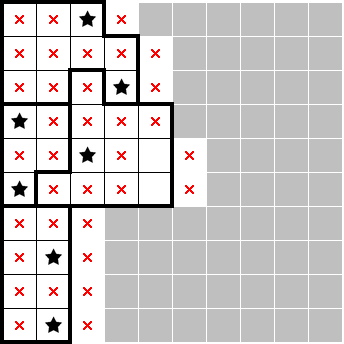
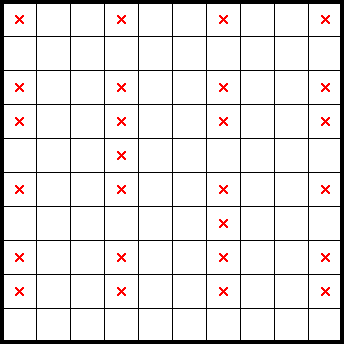
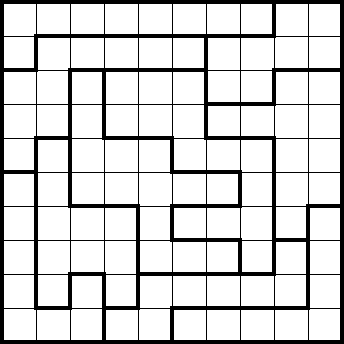
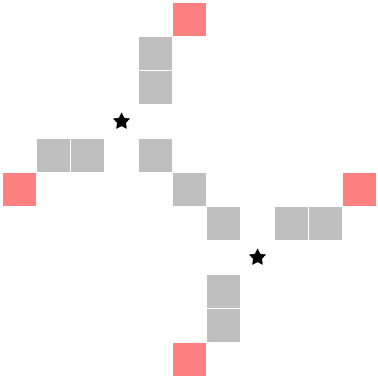
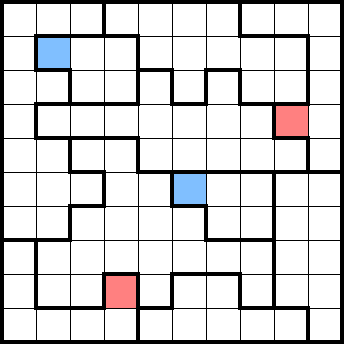
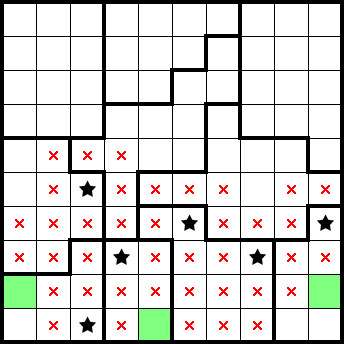
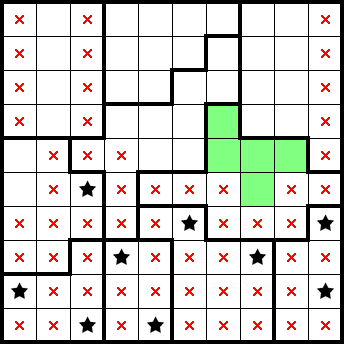
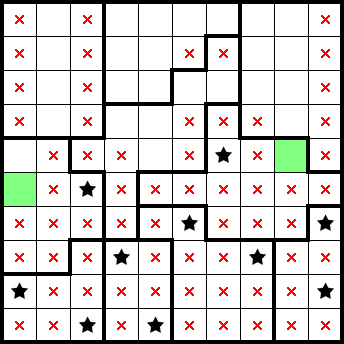
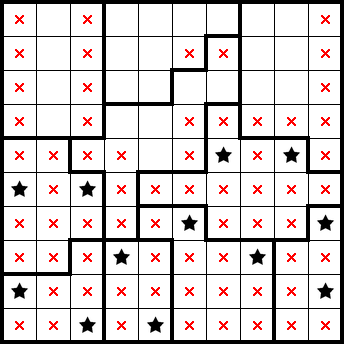
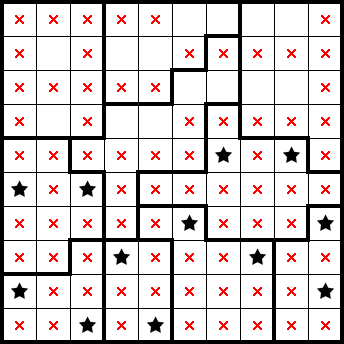
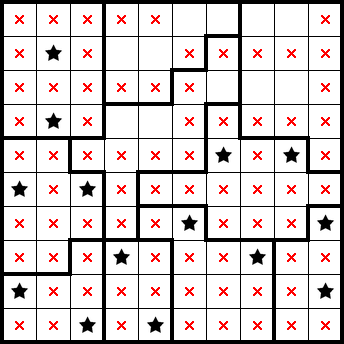
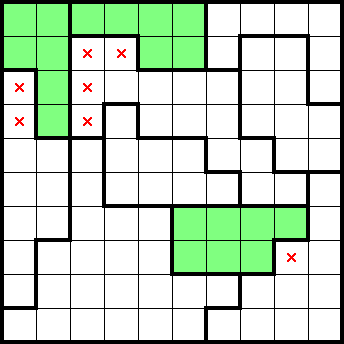
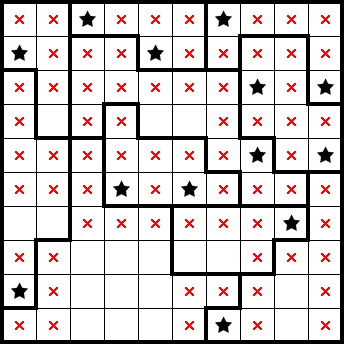
Below is an example 10×10 2★ puzzle and its solution:
Overview
The most popular variant is 10×10 2★, and as a result, most of this page's examples focus on 2★ puzzles. That said, many of the ideas and techniques can generalize to arbitrary numbers of stars.
Much of Star Battle revolves around bounding the number of stars in specific regions of the puzzle, and cross-referencing sets of such information with pigeonhole-esque logic to make progress. While there can be many logical routes to reach the same conclusion, having multiple perspectives from the techniques below makes it easier to spot opportunities for progress.
If you'd like to try solving Star Battle puzzles, PuzzleTeam is arguably the best place to (practically) endlessly solve computer-generated puzzles! Of note, I don't run that site and was not asked to promote it—it's simply where I go to solve them and their puzzles are at a difficulty where a lot of these techniques can be fleshed out. If you'd like to solve hand-set puzzles, Grandmaster Puzzles has a wonderful collection!
Contents
1. The basics
This section details the fundamentals of solving Star Battle puzzles. This includes what immediately follows from the rules as well as key observations which lay a foundation for advanced techniques.
1.1 Trivial marks
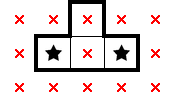
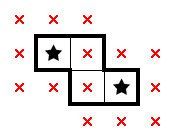
Given that no two stars can touch (even diagonally), you may mark all cells which share an edge or corner with a star:
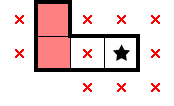
Given that the number of stars in a row (or column) must equal the specified number of stars, you may mark the remainder of a row (or column) if it already has the specified number of stars. For example, for 2★:
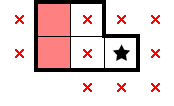
Given that the number of stars in a shape must equal the specified number of stars, you may mark the remainder of a shape if it already has the specified number of stars. For example, for 2★:
1.2 The 2×2
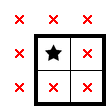
A 2×2 is the largest region that contains at most one star—this bound follows from stars not being able to touch:
The significance of this lies in the information you can get from tiling a larger region with 2×2s. In particular:
- The minimum number of 2×2s required to tile a larger region will bound that region to have at most that many stars.
- After tiling a region, if the number of 2×2s is equal to the known number of stars in that region, each 2×2 contains a star.
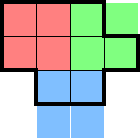
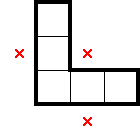
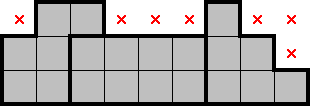
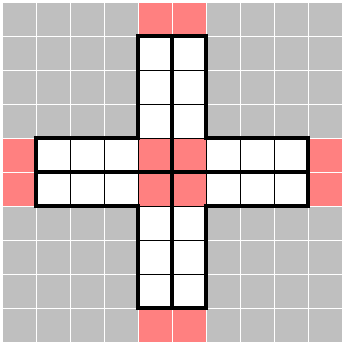
For example, the following shape can be tiled using a minimum of two 2×2s. This means that it can fit at most two stars:

If this was in a 2★ puzzle, we further know that each 2×2 contains a star. Because one of the 2×2s only has one cell within the region, that cell must contain a star:
As another example, the following shape can fit at most three stars:
Of note, there can be many possible ways to tile a region with 2×2s. The above remains true regardless and considering several different tilings can yield additional information.
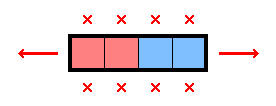
1.3 The 1×$n$
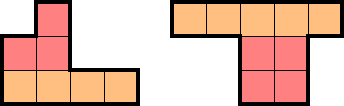
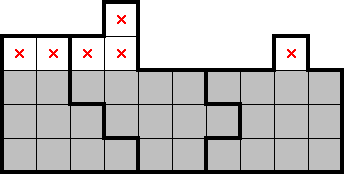
The 1×$n$ (or $n$×1) refers to regions which are known to have at least one star, but are confined to a single row (or column). Such regions can often be identified by partially tiling a shape. In the following 2★ examples, the red cells contain at most one star, implying that the orange cells contain at least one star.
Should multiple 1×$n$s fall in the same row (or column) and account for every star in that row (or column):
- The remainder of the row (or column) can be marked.
- The bound on each 1×$n$ goes from at least one star to exactly one star. If a 1×$n$ was part of a larger shape, this may adjust the bounds of 2×2s in the remainder of the shape from at most one star to exactly one star.
In the following 2★ example, we get several marks and deduce that the each 2×2 in red has exactly one star:
Of note, the "pressure" exerted by the left 1×$n$'s presence allows us to identify both stars in the shape on the right. Further, the symmetry of the shape on the left lets us also consider a column-wise 1×$n$!
1.4 Exclusion
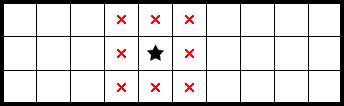
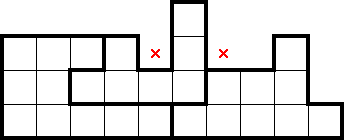
Exclusion refers to marks obtained in cells where—should they contain a star—a shape, row, or column would no longer be able to fit the specified number of stars. This can be deduced by considering a star's immediate marks and attempting to tile the remainder of a shape, row, or column with 2×2s. Such cells can be both inside and outside of the considered region, e.g., for 2★:
1.5 Pressured exclusion
Pressured exclusion is like exclusion, but in the presence of other stars or 1×$n$s. For example, for 2★, we get the following exclusion mark when taken together with the 1×$n$ below:
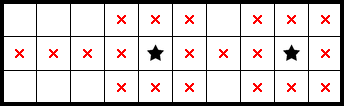
Pressured exclusions can be used extensively with identified star-containing-2×2s, e.g., those found via a squeeze. If the star-containing-2×2 contains marks such that it forms an L or diagonal shape, there's potential for the following marks (highlighted in red) given that there's a star or 1×$n$ present in the corresponding row (or column):
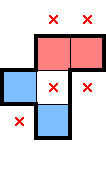
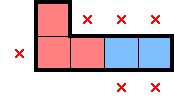
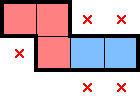
1.6 Simple shapes
By following the above principles—namely a combination of the 2×2 and exclusion—we can often deduce several marks (and occasionally stars) for simple shapes. Such shapes are easy to spot and are typically how one starts a solve off. It's good to work some of these out and internalize them—this lets you focus on harder-to-spot deductions!
For 2★, below are what stars, marks, and star-containing-2×2s can be deduced from select simple shapes. There are plenty of other shapes which readily provide comparable information, but this should be a decent starting point. For each shape below—as an exercise—convince yourself that the deduced information is true:
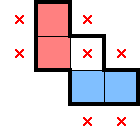
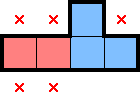
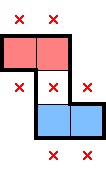
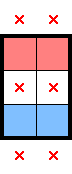
While the above diagrams highlight star-containing-2×2s, it's worth considering whether each shape also has a 1×$n$ decomposition. In contrast with identifying 2×2 regions with exactly one star, having a row (or column)-constrained region with at least one star can lead to different, further deductions.
2. Counting
Counting in Star Battle generally refers to considering regions of the board with known star counts, and seeing how many of their stars are accounted for. For example, considering large groups of consecutive rows (or columns), and cross-referencing them with information about the intersected shapes.
2.1 Undercounting
Undercounting occurs when a collection of $n$ shapes is completely contained within $n$ rows (or columns). In such cases, the stars in those $n$ rows (or columns) must be in those shapes. This allows for marking the cells of the $n$ rows (or columns) which lies outside of the $n$ shapes. For example:
2.2 Overcounting
Overcounting is equivalent to undercounting from the opposite direction, but in some situations might be easier to spot. Overcounting occurs when a collection of $n$ shapes completely contains $n$ rows (or columns). In such cases, the stars in those shapes must be in those $n$ rows (or columns). This allows for marking the cells of each shape which lies outside of the $n$ rows (or columns). For example:
2.3 Finned counts
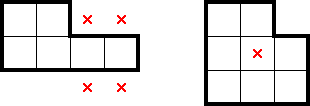
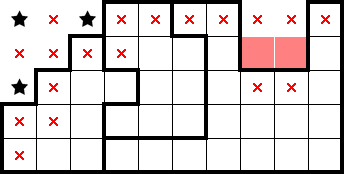
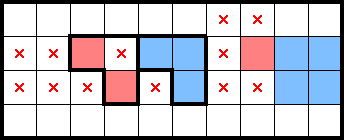
When trying to spot undercounting, there will inevitably be situations where shapes just barely exceed the necessary conditions. If placing a star in a cell would readily create an undercounting scenario across rows (or columns) which contain that cell, it would force too many stars into the undercounted rows (or columns), and thus can be marked. In the following example, if the marked cells contained stars, it would readily create an undercounting situation which would have marked those same cells:
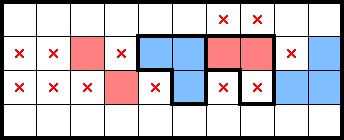
Looking at things from the other direction, we similarly can spot finned overcounting. If placing a star in a cell would readily create an overcounting scenario across rows (or columns) which do not contain that cell but includes the shape that cell is in, it would force too few stars into the overcounted rows (or columns), and thus can be marked. For example, if the following marked cells contained a star, it would readily create an overcounting scenario which would have marked those same cells:
2.4 Composite shapes
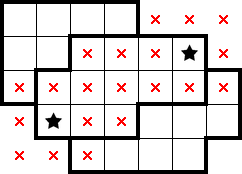
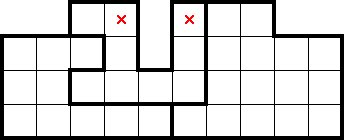
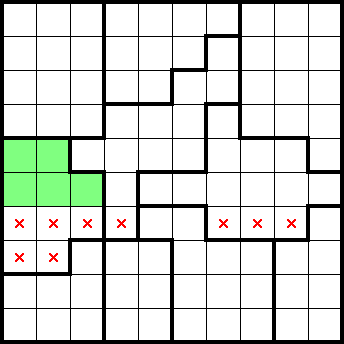
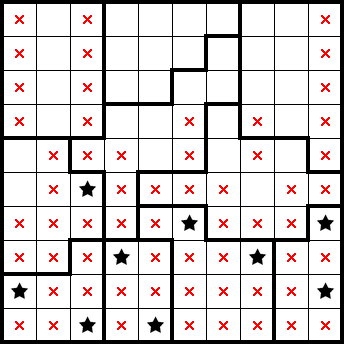
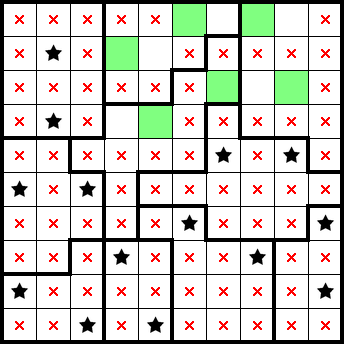
The previous examples relied on conveniently-located shapes. In all other cases, we count the shapes that we can and treat what's left as "composite shapes" with a known star count. In the following 2★ example, we have three large shapes contained within five rows. This accounts for six out of ten stars, meaning the remaining area—regardless of specified shapes—can be treated as a composite shape which contains four stars (highlighted in green):
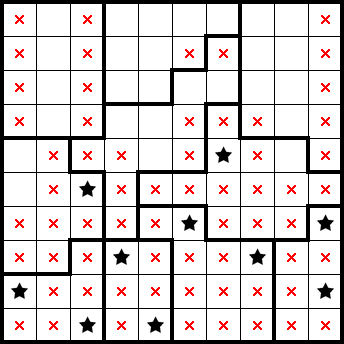
Because the composite shape can be minimally tiled with four 2×2s, we can deduce the following:
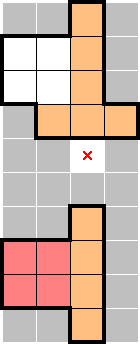
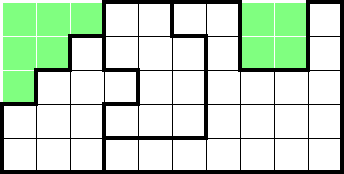
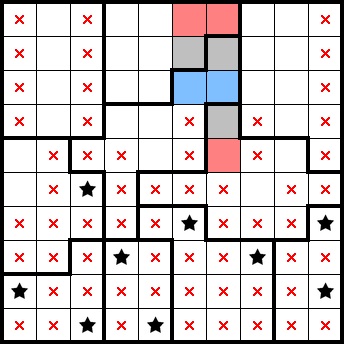
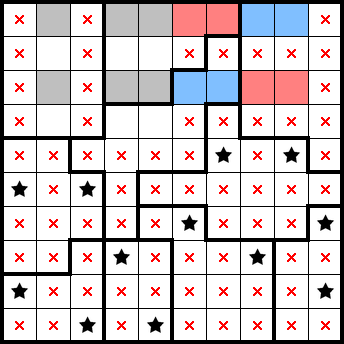
For another 2★ example, consider the bottom two rows in the following:
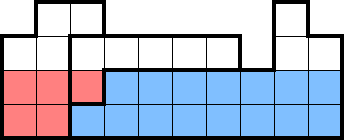
From minimally tiling 2×2s, the area in red has at most two stars. The area in blue similarly has at most two stars as a result of being fully contained within a shape. Because there are four stars across two rows, we can deduce that each area has exactly two stars and can view the red area as a composite shape with two stars. This lets us mark the remainder of the shape on the right and gives the following information in the composite shape:

Beyond composite shapes deduced from counting, we can simply combine any regions of known star count into a composite shape containing the sum of the regions' star counts. For example, for 2★, the following two shapes can be better viewed as a composite shape containing four stars:
This perspective shines here because the composite four-star shape can be minimally tiled with four 2×2s! This gives us much more than what can be deduced from considering each shape in isolation:
2.5 The squeeze
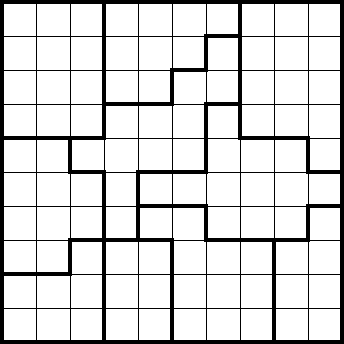
A squeeze refers to minimally tiling 2×2s across pairs of consecutive rows (or columns) where every star can be accounted for. While squeezes can be thought of as a special case of forming composite shapes, they deserve separate acknowledgement from how impactful and easy-to-spot they can be. In 2★, we're specifically looking to minimally tile a pair of rows (or columns)—typically ones with existing blocks of marks—with four 2×2s. In the following 2★ example, we can squeeze four 2×2s across the middle pair of columns and get some marks from excluding one of the star-containing-2×2s:
In a more extreme—but not that uncommon—2★ example, a squeeze (and subsequent chain of exclusions) can identify all four stars in the pair of columns below:
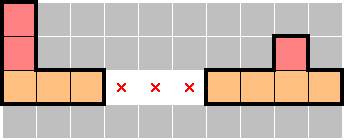
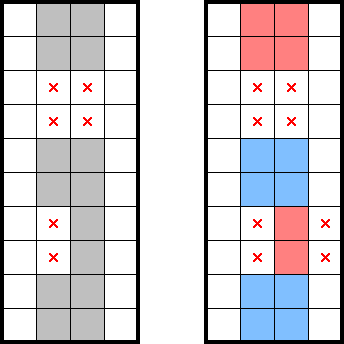
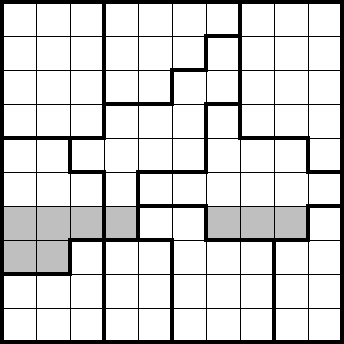
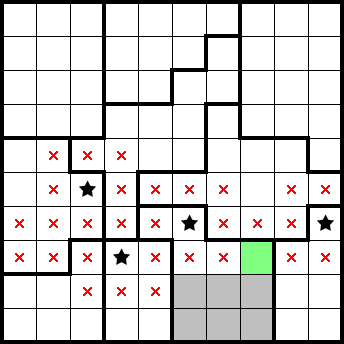
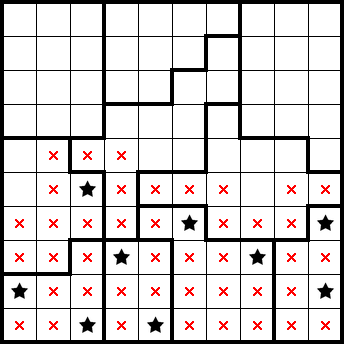
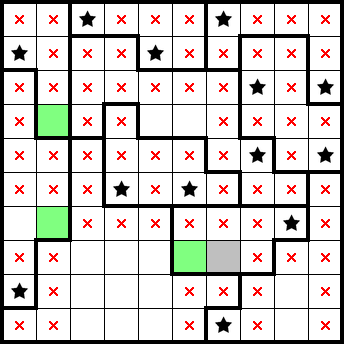
Even if a squeeze doesn't readily produce stars or marks, the identification of several star-containing-2×2s is really valuable information. For example, the results from the following (2★) column-wise squeezes account for all four stars in the bottom two rows. This lets us mark the remainder of those rows (highlighted in grey):
In a similar vein as the previous example, the information from the following (2★) squeeze accounts for both stars in the middle shape. This lets us mark in the remainder of that shape (highlighted in grey):

2.6 Set differentials
Parts of the counting section can be further generalized under tbe concept of computing set differentials. We can add and subtract equivalent sets to identify regions with varying numbers of stars. where addition and subtraction consists of incrementing (or decrementing) a count for each cell within a set, while adding (or subtracting) the total number of stars across this set. Consider the following four shapes of a 10×10 2★ puzzle:
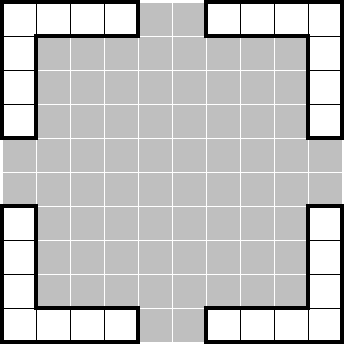
We can add the top and bottom rows of the puzzle. Each row is a set that's known to contain exactly two stars, giving an initial total of four stars:
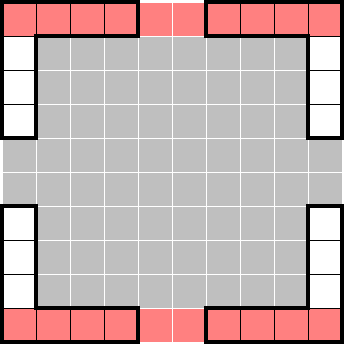
We can add the left- and right-most columns to this. Each column is a set that's known to contain exactly two stars, bringing the total to eight stars. Note that due to overlap, the corner cells have a count of two.
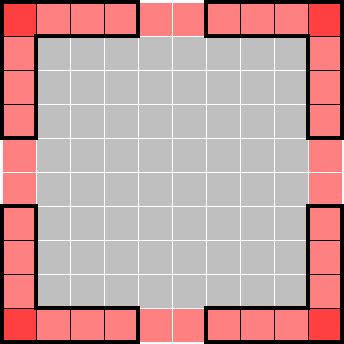
We can now subtract the four shapes. Each shape is a set that's known to contain exactly two stars. Having eight stars across the four shapes, this subtraction results in a total of zero stars across the resulting set:
Because the resulting set doesn't have any double-counted or negative cells, we can readily treat this as a region of the puzzle with a known star count of zero. This gives the following marks:
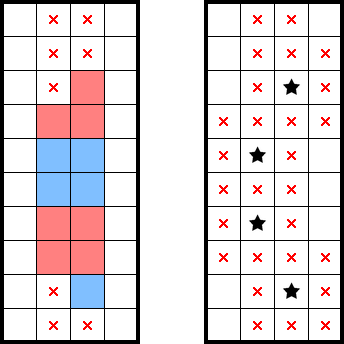
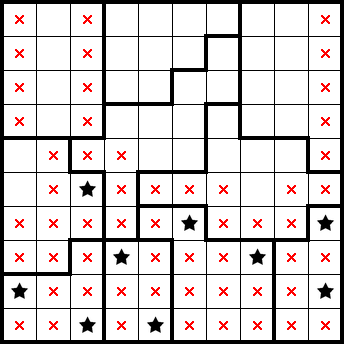
As an exercise, use set differentials to show that the red region in the following 10×10 2★ example has zero stars (and can be marked):
As another exercise, use set differentials to show that the red region in the following 10×10 2★ example has six stars:
Hint
The 2×3 gets counted twice!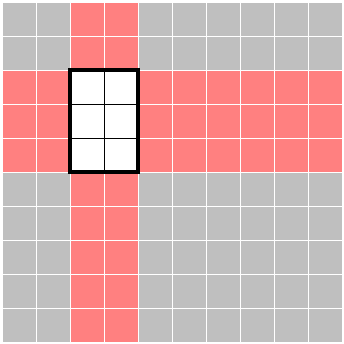
3. Uniqueness
Uniqueness involves making deductions under an assumption that a puzzle has only one solution. This is often a reasonable assumption because if a puzzle's solution wasn't unique, there wouldn't be a logical path forward. I personally avoid it when casually solving hand-set puzzles—as the setter likely had an intended logical route in mind—but I use it extensively when speed-solving computer-generated puzzles.
Most uniqueness-related deductions involve considering how the state of some region of the puzzle can be influenced by the rest of the puzzle. As marks accumulate, situations arise where there's only one way in which the rest of the puzzle can determine the locations of stars in a region. As such, spotting cases where uniqueness arguments apply generally involves looking out for small shapes which are (almost or completely) engulfed by marks. This section details the most common applicable scenarios that arise, but is not exhaustive.
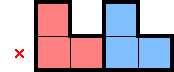
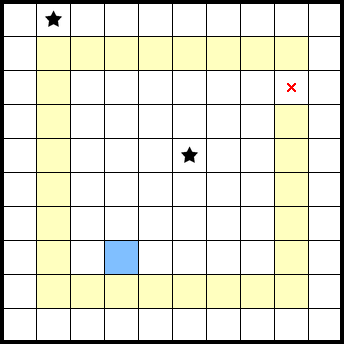
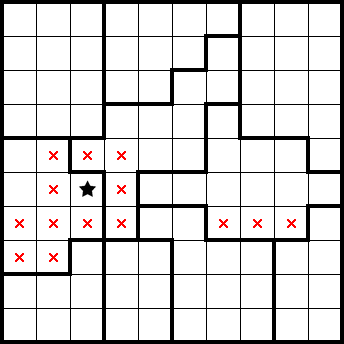
3.1 By a thread
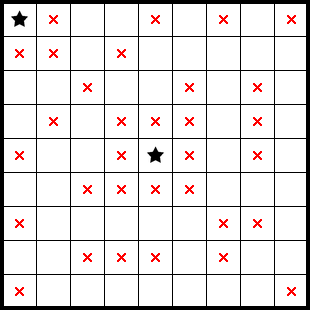
Consider the following 2★ scenario, where we know that there's a star in each of red and blue:
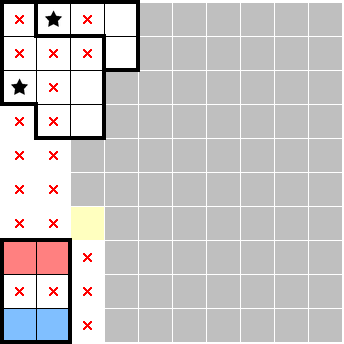
Given that there is already one star in each of the first two columns, we know that the red and blue stars must be in opposite columns. If the yellow cell wasn't a star, then both red and blue configurations are possible with no way for the rest of the board to specify it. The yellow cell being a star is the only way in which the red and blue configuration can be specified:
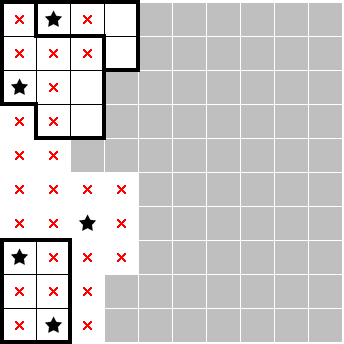
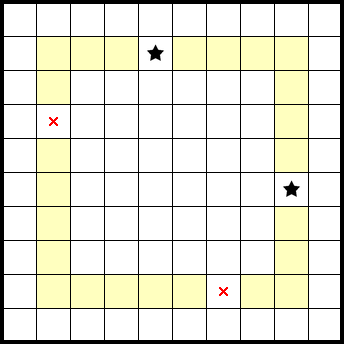
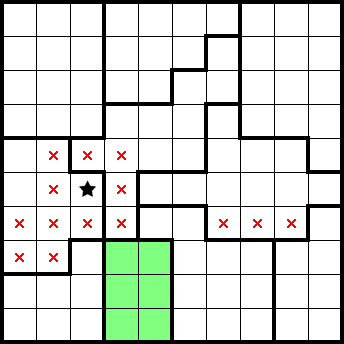
3.2 At sea
Now consider the following 2★ scenario, where again, we know that there's a star in each of red and blue:
Here, there's no "thread" by which an adjacent star can influence the bottom-left area. Taken together with the observations in 3.1, we also know that the red and blue stars can't be in different columns as there's no way for the rest of the board to specify it. In other words, the red and blue stars must be in the same column.
If the stars in red and blue were in the left-most column, the stars in yellow would be in the inner (second) column. In this case, we would be able to swap the stars between the first two columns to produce another valid solution without influencing the rest of the board. To uniquely specify the solution, the red and blue stars must be on the inner (second) column. This provides further information in that the puzzle will somehow force the stars in yellow to be in the left-most column:
Of note, we can also deduce that the red and blue stars must be in the inner (second) column by observing how if the stars were in the left-most column, the second and third columns will only fit at most three stars. This observation is specific to 10×10, however.
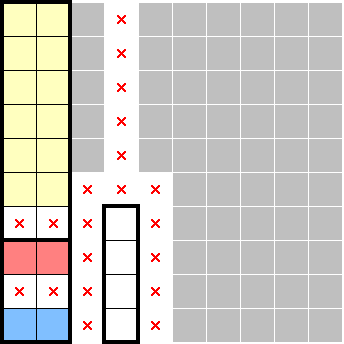
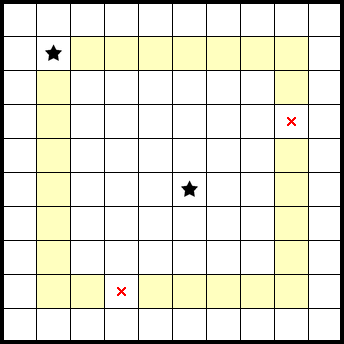
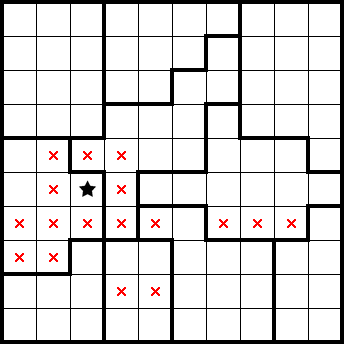
3.3 By a thread at sea
Lastly, let's consider the following 2★ scenario:
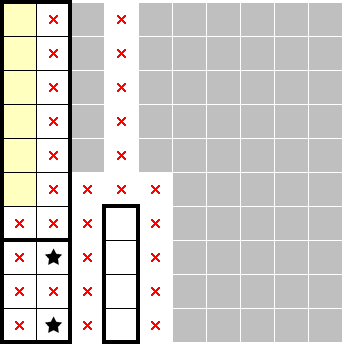
Based on 3.2, we know that the red and blue stars must be on the inner (second) column. However—like 3.1—the yellow cell is the only "thread" by which this can be enforced! This gives an additional star in yellow:
4. Idiosyncrasies
This section details further nuances that didn't really fit in the other sections.
4.1 Kissing Ls (2★)
Kissing Ls is an easy-to-spot pattern that shows up relatively often—particularly from the results of a squeeze. The pattern readily gives a mark in 2★, but can still apply in larger puzzles with sufficient pressure from additional stars (or 1×$n$s). Kissing Ls consists of two L-shaped star-containing-2×2s in the following configuration:
We can get the mark above because a star there would force too many stars into a given row (or column, with vertical Kissing Ls). We can see its application in the following row-wise squeeze:
Counting from the left, the first two star-containing-2×2s form (partially occluded) Kissing Ls. This gives a mark (and a star):
Of note, the second and third 2×2s of the squeeze also form Kissing Ls. The resulting mark, however, is not as impactful:
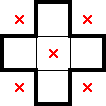
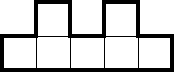
4.2 The M (2★)
The M is a region which can be minimally tiled with three 2×2s, but in a 2★ puzzle, contains at most two stars. The M—which may span multiple shapes—is shown below:
Spotting the M can enable squeezes which otherwise would not have been informative. For example, for 2★, the following pair of rows is minimally tiled by five 2×2s:
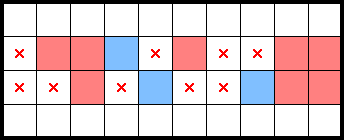
However, acknowledging that the following (yellow) M has at most two stars, we can squeeze the remaining area of this pair of rows and identify a star:
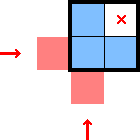
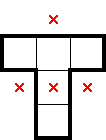
4.3 Pressured Ts (2★)
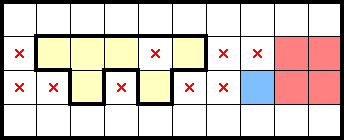
A Pressured T refers to a 2★ scenario where a T-tetromino has a star (or 1×$n$) in the same row (or column) as the long 1×3 section of the tetromino. In such cases, the T-tetromino contains at most one star:
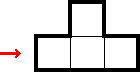
Similar to the M, spotting a Pressured T can enable squeezes which otherwise would not have been informative. Consider the following 2★ squeeze:
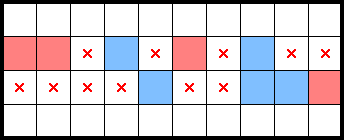
The above squeeze is minimally tiled by five 2×2s, which would normally be uninformative. However, acknowledging the (yellow) Pressured T, the squeeze can give a star (and some marks):
Of note, the above example can have two stars in the T-tetromino, e.g., if the left-most 2×2 did not contain a star. The pressured T perspective moreso suggests that if the left-most 2×2 contained a star, the tetromino would have at most one star and we can tile the remainder of the area to get a star regardless.
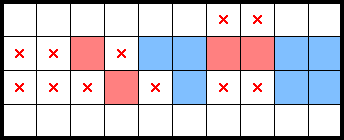
4.5 Fish
Fish is a term that's borrowed from an analogous technique in Sudoku, and denotes patterns where across $n$ columns, the stars are constrained to be within the same $n$ rows. In such cases, the rows may be marked in all cells outside of those columns. The reverse is also true for $n$ rows having stars constrained to the same $n$ columns. For example, with the following marks in a 2★ puzzle:
Here, the stars across four columns are constrained to be within the same four rows. Because there are eight stars across the four columns, the eight stars for the four rows are accounted for, allowing us to mark the rest of the shared rows outside of those columns (highlighted in grey):
While such cases may arise in 2★ puzzles, they are considerably more prevalent in 1★ puzzles—particularly finned fish which are one mark away from being a fish. Consider the following marks of a 1★ puzzle, with a finned fish in red:
If placing a star would readily create a fish, and the star would fall in the resulting fish's affected area, we can mark them:
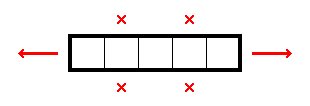
4.5 $n$-rooks
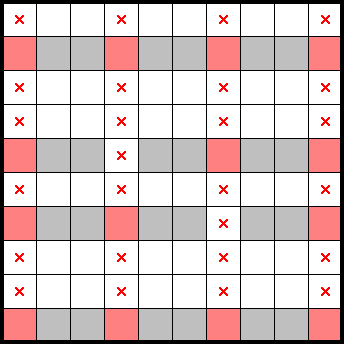
This applies to $s$★ puzzles on $(4s+2)$×$(4s+2)$ grids (e.g. 6×6 1★, 10×10 2★). Here, we'll consider 10×10 2★ puzzles. If we subdivide a 10×10 grid into a 5×5 grid of 2×2s, the 2×2s which don't contain stars will form an $n$-rooks configuration (i.e., exactly one in every row and column). For example, with the following 2★ star configuration (ignoring shapes):

This is due to there being four stars across a pair of rows (or columns): Should there be two (5×5 $n$-rooks grid-aligned) empty 2×2s across a pair of rows, we would only be able to fit three stars there.
The applicability of the $n$-rooks property is well-demonstrated in the following 10×10 2★ puzzle by Maho Yokota:
Consider the following composite shape in the center:
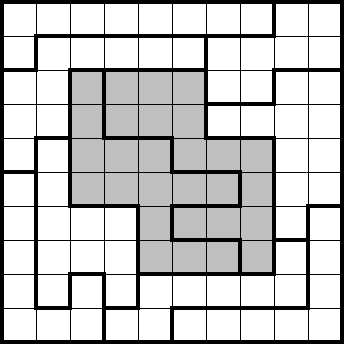
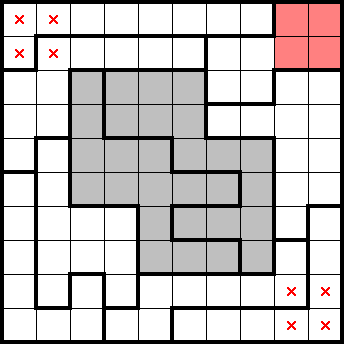
This region has four stars and is minimally tiled with seven 2×2s. This means that it must contain three empty 2×2s in its minimal tiling. Because the shape's tiling is aligned with the 5×5 $n$-rooks grid, we know that the three empty 2×2s will give us three of the five rooks. Because these three rooks lie in the middle 3×3 of the 5×5 $n$-rooks grid, the remaining two must lie on opposite corners of the puzzle! Considering the simple shape in the top-right corner, we can identify both corner rooks:
Acknowledging that the remaining rooks lie in the central composite shape, a sea of squeezes reveals that all of these 2×2s contain a star:
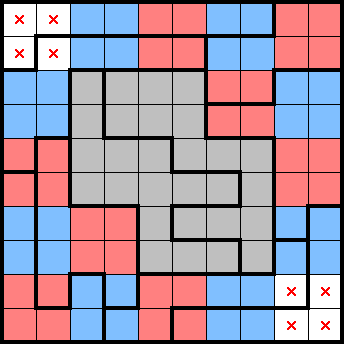
Observing that we've identified both stars in the middle-right shape gets us some marks. The rest is an exercise for the reader—try it here!
4.6 Entanglement
Entanglement refers to non-trivial marks obtained in the presence of specific star configurations. Such cases are dependent on puzzle-size, and are found by brute forcing every valid star configuration. Basically, you can tell by the way it is.
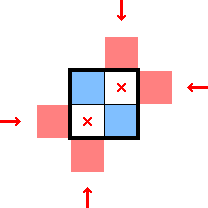
There are plenty of entanglement-related marks given three stars on a 10×10 2★ puzzle, but for practical memorization and ease-of-spotting, we'll only worry about the following two-star case:
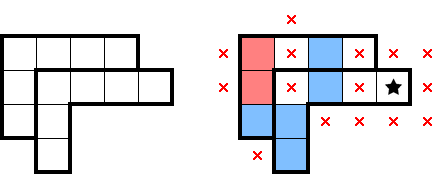
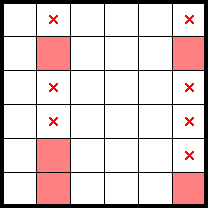
If a 10×10 2★ puzzle has two stars that are exactly the above distance apart, the red cells can't contain a star if the red cell lies in the ring of cells that's one cell from the edge of the puzzle. For example:
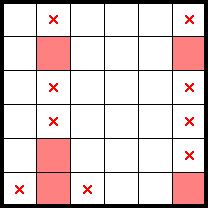
One of the above red cells lies in the aforementioned ring of cells (yellow) and gives a mark. In contrast, because it does not lie in the ring, the blue cell does not give a mark despite being in an entanglement location. Here are a few more examples:
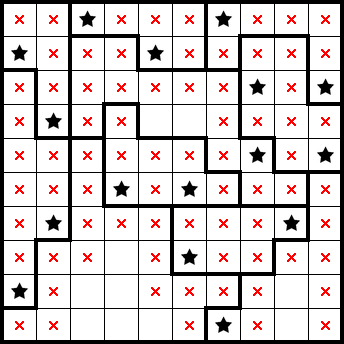
Of note, this page's example puzzle—which was used to demonstrate Star Battle's rules—is a hand-set puzzle of mine that was designed to be much easier if aware of entanglement (try it here!):
While out of this page's scope—to showcase the entanglement rabbit-hole—below is a glimpse of what entanglement looks like on a 9×9 2★ puzzle...
5. Example solves
In this section, we'll go through some example solves in detail!
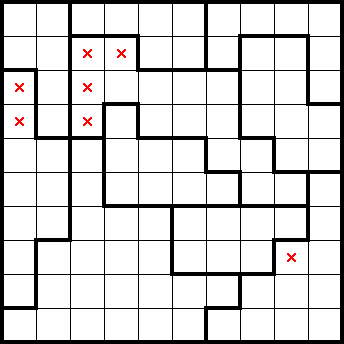
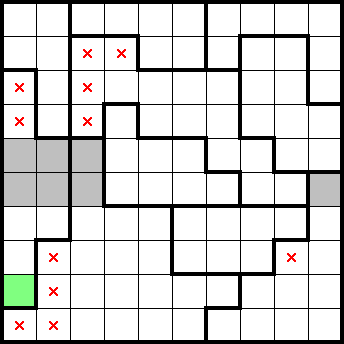
Below is a "10x10/2★ Normal" puzzle from PuzzleTeam (ID: 10,868,214). You can try it yourself or follow along here!
If we consider the bottom four rows, we can see that there are four shapes completely contained within them. By undercounting, we get the following marks:

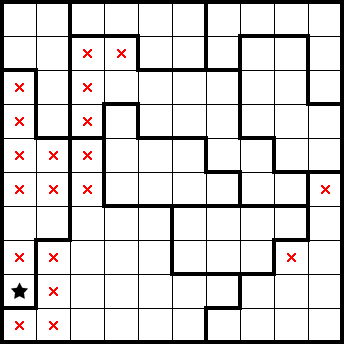
We readily get a star from this simple shape:
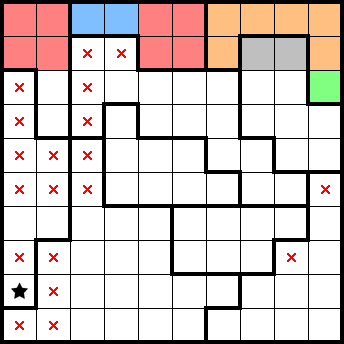
We readily get some marks from this simple shape:
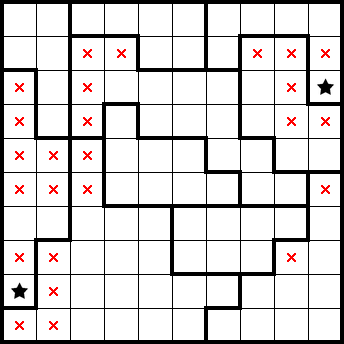
We get two stars from this row only having two empty cells:
We readily get a star from this simple shape:
We get a star from this row only having one empty cell. Because this identifies both stars in the corresponding shape, we can also mark the remainder of it:
We readily get a star from this simple shape:
We get two stars from the second row from the bottom only having two empty cells, and another star from a shape only having one empty cell:
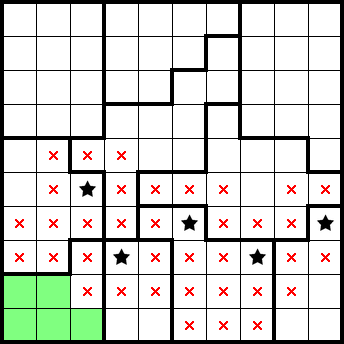
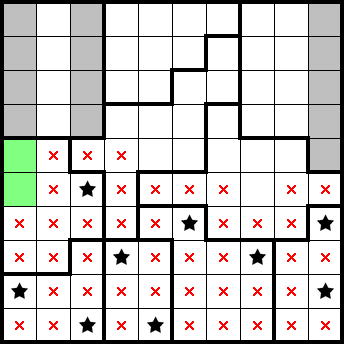
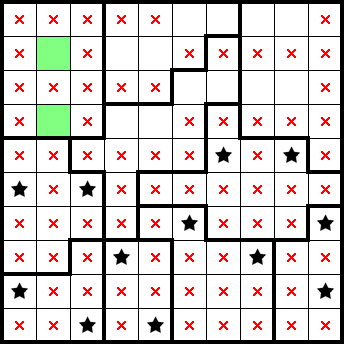
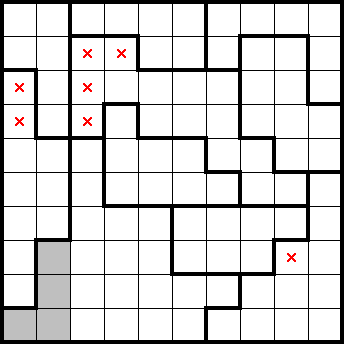
We know that there's a star in the following green 1×$n$, letting us mark the remainder of the left-most column. We similarly already have two stars accounted for in two other columns, and can mark the remainder of them:
We readily get some marks from this simple shape:
If we squeeze the sixth and seventh columns from the left, we get a star. We also get several marks (grey) from subsequent exclusions of the identified star-containing-2×2s:
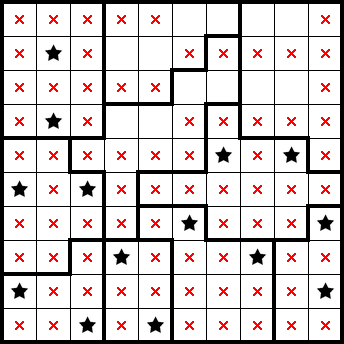
We can get a star from a row only having one empty cell, and another star from a shape only having one empty cell:
We already have two stars accounted for in the fifth row from the top, and can mark the remainder of it. We also readily get some marks from this simple shape:

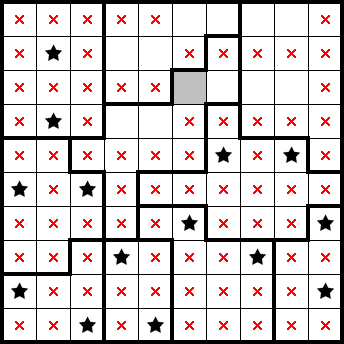
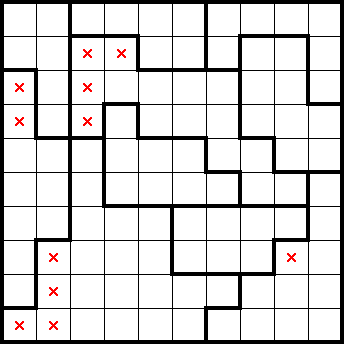
By squeezing the sixth and seventh columns from the left and tiling the top-right simple shape, we have the following 1×$n$s. These account for both stars in each of the first and third row from the top, letting us mark the remainder of those rows (grey):
We can get two stars star from a shape only having two empty cells:
We get a mark in this cell as it excludes the column to its left:
We get a star from the sixth column from the left only having one empty cell, and the rest readily follows:
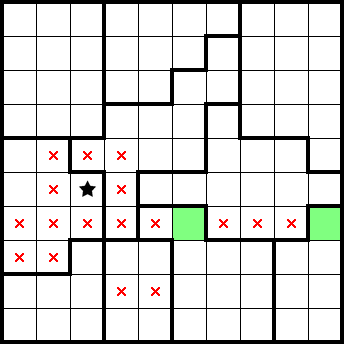
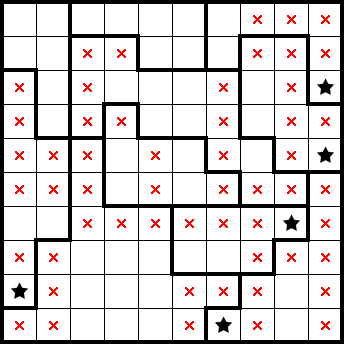
Below is a "10x10/2★ Normal" puzzle from PuzzleTeam (ID: 17,373,587). You can try it yourself or follow along here!
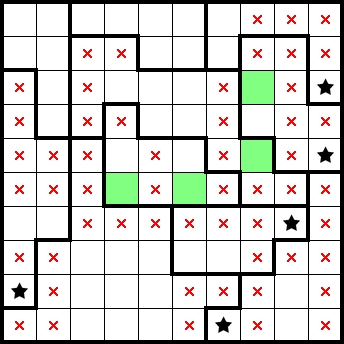
By considering the puzzle's immediate simple shapes (highlighted in green), we get the following marks (highlighted in grey):
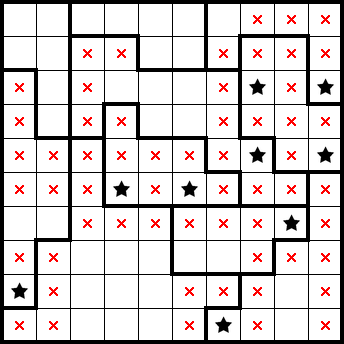
If we consider the first two columns (from the left), we can see that there are two shapes completely contained within them. By undercounting, we get the following marks:
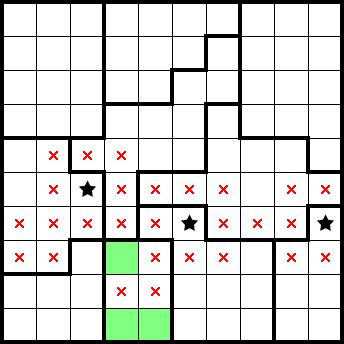
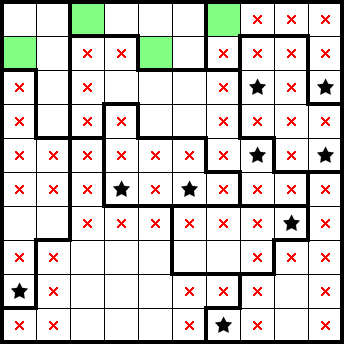
If we consider the bottom four rows, we can see that they are completely contained within four shapes. By overcounting, we get the following marks (highlighted in grey) and a star from considering a resulting simple shape (highlighted in green):
If we look at the top two rows, we have three stars readily accounted for from minimally tiling 2×2s across simple shapes. The shape in the top-right must have at least one star in the top two rows (highlighted in orange), as it can only fit one in the remainder of the shape. This gives the following marks (highlighted in grey) and gives a star (highlighted in green):
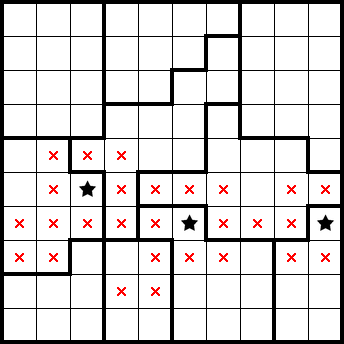
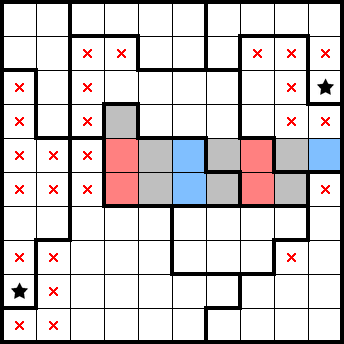
If we squeeze the fifth and sixth rows from the top, we can identify four star-containing-2×2s. From how tightly packed they are, we also know that stars must be on alternating columns by considering resulting exclusions. This identifies both stars in the middle shape—allowing us to mark the remainder of the shape—and gives a star on the right:
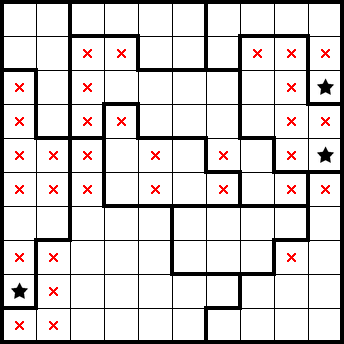
We have identified both stars in the right-most column, allowing us to mark the remanider of that column. By considering the remainder of the following simple shape (highlighted in blue), we get some marks from excluding it. Taking the remainder of this simple shape together with the results of the previous squeeze (highlighted in red), we have identified both stars in the third column from the right and can also mark the remainder of that column:
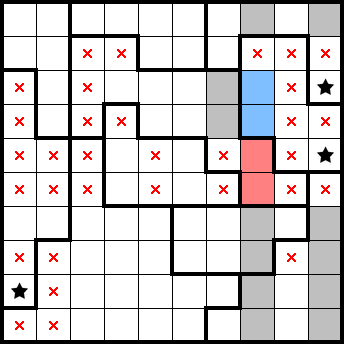
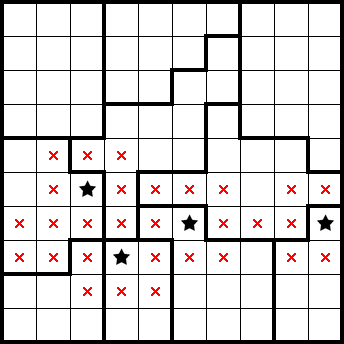
We get a couple of stars from the resulting simple shapes (highlighted in green). Taking this together with the following 1×$n$s (highlighted in red), we can also mark the remainder of the seventh row from the top and the second column from the right:

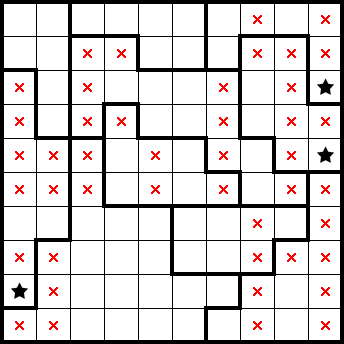
We can readily identify both stars in the sixth column from the top as well as the third column from the right.
We get a star from the top-right shape only having one cell remaining. By considering the resulting simple shape to its left, we get another star and identify both stars in the top row. This readily gives us both stars in the second row as well:
We can readily identify both stars in the second column from the left. Further, we have identified both stars in the fourth column from the right. This lets us mark the remainder of the column (highlighted in grey) and gives us a star from having only one cell remaining in a shape:
We've identified both stars in the sixth column from the left. This allows us to mark the remainder of that column and gives us a star from from having only one cell remaining in a shape. By considering subsequent completed rows (and columns), the rest readily follows: